Pages

Sunday, June 28, 2015

Behringer UM2 OLD DRIVERS and differences with new ones.

For the ones that purchased a Behringer UM2 audio interface, you'll know it works without any drivers for basic recording. However, to make it fully operational (like enabling the second input), you need to install some software.

In the Behringer website, there used to be custom Behringer drivers for this particular device. Now the site just redirects to ASIO web, where you can download the standard ASIO drivers. As they're not custom, they don't work as good as the old drivers (keep reading).


Differences with new drivers

There is one major very important difference. 

With the new drivers the system install a generic USB audio driver and the PC sees the interface in Recording devices as a microphone input. When you try to record with a simple software like Audacity or simply you want the audio to sound through the Stereo Mix, you can only hear what is plug in the mic input of the interface. To use the second channel you have to use complex software like DAWs and mess with ASIO.

With the old drivers the system install a custom Behringer USB audio driver and the PC sees the interface in Recording devices as a line input. Now, all the inputs of the interface work without further trouble. You can capture the sound with the program you want and it will sound through the Stereo Mix as well. You don't need ASIO for anything.


It has been a hard job to find the old drivers in the internet for this model but here they are:

Behringer UM2 64-bits Windows 7/8 drivers, version 2.8.40.
(Sorry but I don't have any other version, OS, nor architecture).

Update (23/06/2020): Reader Ceiba Groove comments that got the drivers working in Windows 10 under compatibility mode.

https://mega.nz/#!fpF2RD6S!tdk6sCz1ePU77DMySDpJIsauvOCW-Zjxve_ixqq71UI

The 'Readme' file says they should work for
'UMA25S, UCA200*, UCA202, UCA222, UFO202, UCG102, iAXE393/624/629 and many more.

*bundled with UMX series, XENYX mixers, PODCASTUDIO USB


This driver does NOT support the following BEHRINGER hardware:
C-1U, BCD2000, BCD3000.
These models have separate dedicated drivers'

Enjoy, and if you need some help, let me know in the comments.

Update (17/09/2025):
If you find issues using the interface with newer software, set in Windows Sound (both under Playback and Recording devices) the format to 44100 Hz and uncheck 'Allow applications to take exclusive control of this device'.

Btw, no issues using the driver with W10. 

Saturday, June 27, 2015

What is direct monitoring in audio recording? Why is it so awesome?

Do you have and audio interface with direct monitoring capabilities and you don't have a clue what it is? Then you are an idiot, and I'll enlighten your life.

When you connect an audio interface to your computer, it becomes the default audio input and output device (if you don't change it on purpose). In the process of recording, you plug the audio source to the interface and run a program in the computer to capture the sound. Moreover, the sound that before went through your computer sound card output, now is sent to the interface output (headphones or studio speakers).

When recording, you always need a reference which most of the times is sent to the headphones of the player or singer. This reference can be a metronome or a track, for example. For easy, basic, quick recording, this is fair enough, however for going a bit more pro, it's a good idea to have the sound that you are actually recording, sent to the headphones as well.

Let's say, we're recording a microphone. The main tweak you might think to achieve this is by enabling the interface input to sound through your computer, in your computer OS, so you'll hear the mic through the headphones. In Windows, this is done in the mixer window, and it works like shit.

You'll get your sound, but the processing will introduce a delay in the captured signal (and not in the reference track), that will depend on how expensive your audio interface is, but will always screw your recording attempts.

Here comes super magic direct monitor.

Direct monitoring feature is usually implemented with a switch and a knob to adjust the amount.

It allows you to send the microphone signal, or whatever input signal you have, directly to the headphones jack (almost zero delay), and you will keep listening to the sounds in your computer at the same time. You don't have to master sound engineering to realize you must disable the mic to sound through your PC as we enabled before. (Because if not, you'll have the good signal and the laggy one together).

Now you can plug whatever you want to record to the correct input in your interface and have the reference track you want plus the actual sound you are recording without delay. Magic!

Monday, April 27, 2015

Where is your money on ink?

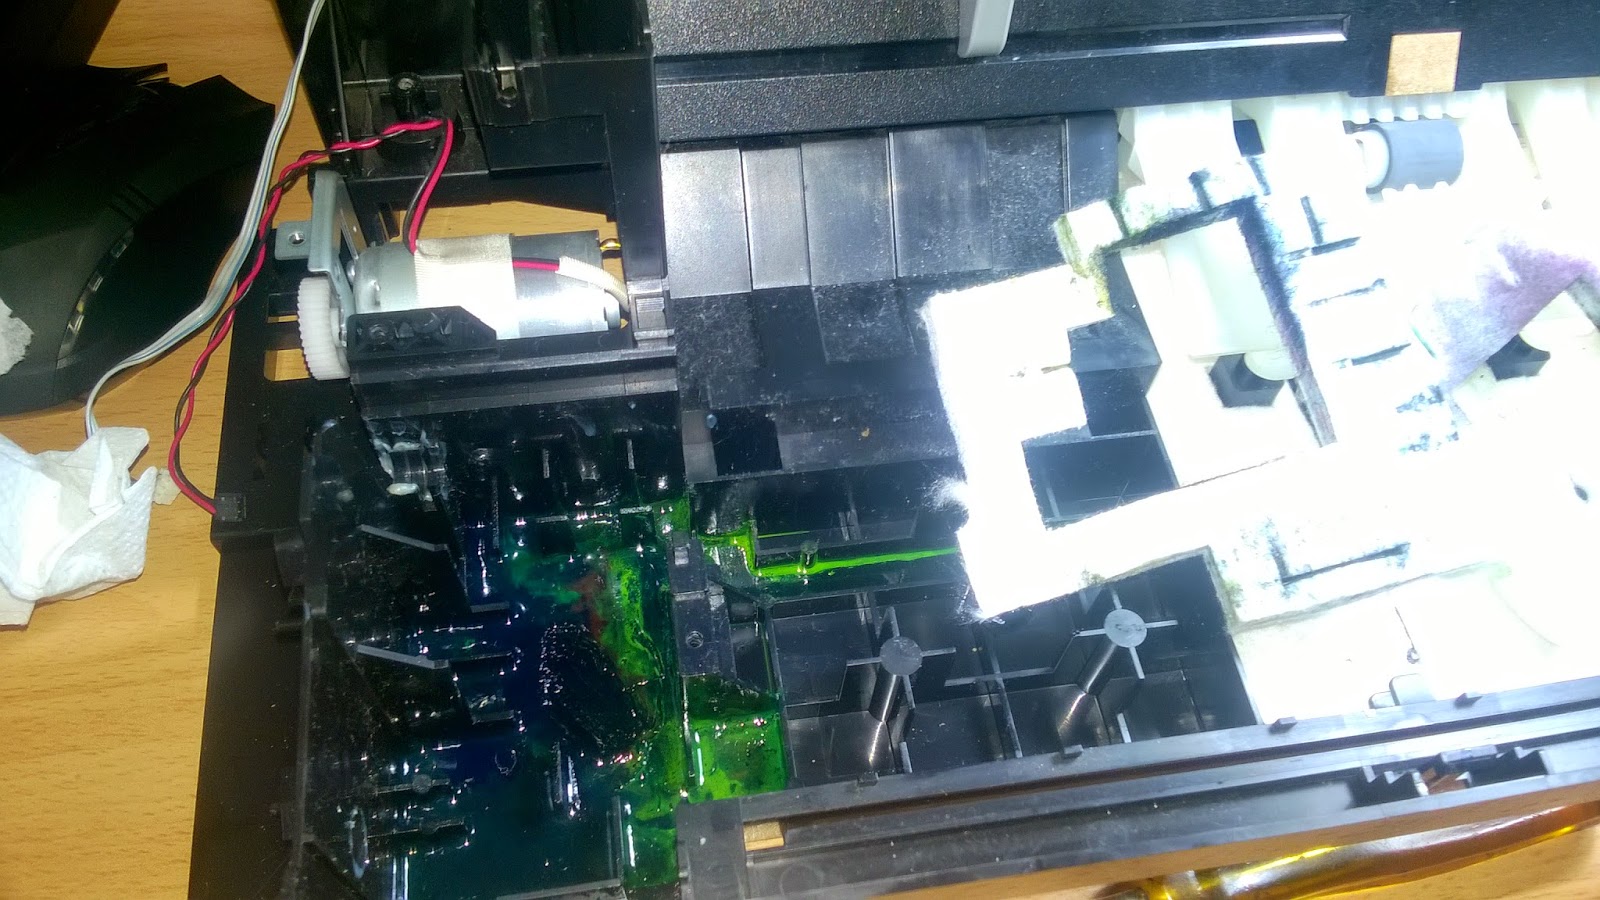
Have you ever heard that your inkjet printer crazily waste ink inside? Whether you have or not, today I've had the opportunity to take apart some printers and I want to show you.

The first candidate is and Epson. The complexity of the mechanism is high, and it's a heavy printer. Does it waste ink?


Yes, it does. A lot.
What you see in the pics is a 5 mm layer of muddy ink. It covers a reasonably large amount of surface in the bottom of the printer. Moreover there are thick, very dense, fiber pads all around to store lots of ink.


There is even a pump that suck ink from the heads and circulate it to the pads through some tubing... I'm glad I no longer use those inkjet scams. This is upsetting.

I also disassembled an HP. The engineering here is far simpler, weights less, does the same and is less noisy.


In the pictures it can't be seen very well, but in comparison, there is little place occupied with wasted ink in the HP. There aren't neither large pads nor pump.

Personally, this is not much of a surprise. Even without taking anything apart, I knew I was being scammed when I used inkjets.
It seems here that HP waste much less juice than Epson, but anyway I'm sure there is no need for this.

If you want my advise, get a laser one.

Sunday, April 26, 2015

The weird building

First of all, the difference between a house and a flat is pretty much all my knowledge about architecture. However, I'd like to show you and comment this building I've found.


This is the School of Telecommunications Engineering, in Valencia, Spain.

What made me stop was that "network" that covers the front of the building, it looked weird and fantastic. Firstly, I checked the distribution of the vertical stones, because it seemed to be randomly placed, and that couldn't be possible. Indeed, I was right. You can see the patterns with a little of observation.


I went nearer to see how it was held there, and more weirdness... If you look close, you'll see the long horizontal rows are made with several short stones. The vertical stones are joint to the horizontal ones. NEVERTHELESS, the horizontal ones are neither joint to the sides of the building nor between them! Crazy!


So!, how is it held? It seems to be attached to the top and to the center part of the building at very few points. This stone network is ALMOST FREE!


But not only that. The rows are noticeably inclined to the front besides.

It definitely is more exciting to see in reality than in pictures. As far as it doesn't fall and kill everyone, good job.

Monday, February 9, 2015

I tried the Oculus

The other day I had a chance to try the Oculus Rift "glasses". I had to queue for a while but since there are some guys freaking out in Youtube with them, I wasn't going to loose the opportunity.

 (Sorry for the quality, almost no light there)

The version I tried was the Developer Kit 2 which is the last out, of course only for developers. I couldn't play, just watch an animation, but fair enough.


The animation was about a roller coaster (Riftcoaster), you can see it Youtube here . The feeling was quite good, in fact it was real enough to make me feel some "virtual altitude sickness" in the higher points of the attraction. The fluency of the animation as you move your head around was very good and real.

However, I found a terrible fail that prevent more enjoyment. The screens inside the glasses had a very low pixel density which almost destroy the experience. If you look carefully, they resemble those old CRT TVs where you could count the pixels if you looked close.

To show you more or less how you really see inside, I've edited a picture.


Click to zoom it. Although you forget this error to pay attention to the video, it's something that must be improved quite a lot.
By the way, I can't remember about the black edges, so they probably aren't something to worry about.

Try them if you can, it's a nice experience.

Really? Thanks readers.

I didn't expect this,


Now, this old, not very updated, not very interesting blog has got 10.000 pageviews. For me, it's a lot!

According to the stats, the top 3 most visited posts of all time is this:

1. Tuning fails (I enjoyed this one).
2. Headphone Bass Booster (That was cool)
3. Amstrad Sinclair ZX Spectrum +2 128K (Something to remember. I won't be able to run that machine again as I did for that post).

So, thank you to the readers that come around regularly (if there is someone), and also to the ones that have ever entered this blog for some strange reason.

Sunday, December 21, 2014

How to fix scratched coating on aluminium

Recently, it fell into my hands a Nokia C5 which was aesthetically brand new, except for some "deterioration" of the back cover. Terrible.


In the pics it doesn't look so bad but in reality it was worse. Even worse if you compared with the rest of the phone, a pitty. The deterioration was only of the transparent coating, not the aluminium itself, fortunately.

Unfortunately, it seemed this cover wasn't very popular and there weren't many fake covers to buy for less money than the original one. This genuine one was 8€ without shipping, so almost half the price I paid for the phone. I had to fix this one.

You might think a good solution for these problems is sanding and re-coating, but it may be a bit aggressive for the first attempt of mending this. So I discover something that was worth a try.

Fixing

What you need to start is a piece of copper to peel off the coating. Copper is less hard than aluminium, which means that there is no way you can scratch aluminium with copper. In Europe, coins of 1, 2 or 5 cents are great for this. So, let's start peeling.


The Nokia brand and model will be intact all the time because they are etched in the aluminium. However, if you have some stupid phone carrier logo there, it will almost surely disappear.

Sometimes you get some brown scratches for the copper. These are easily removed with a rubber eraser.

When you're done, do a hard use of the eraser to clean the surface and to find if it is some coating you missed.


Almost finished. You can stop here if you want, the result is great and shiny. However, if you want to go further and have some car polish around (like this one or similar), it is good to use it.


Of course, it is almost impossible to photograph the difference, but this last photo includes the polishing. This step adds shiner and softer finish.

The end product is impressive. Now it's your turn.